
Connecting to the IaRTN RTK Network
Juniper Systems GNSS receivers—Geode GNS3M, Geode GNS3H, Spire, and Archer 4 with GNSS expansion—are compatible with the Iowa Department of Transportation's Real Time Network (IaRTN) RTK network.
To connect a Juniper receiver to IaRTN RTK network, use one of the following software options:
Juniper Connect — Juniper Systems software utility that connects your GNSS receiver to a third-party mapping software, such ESRI Field Maps.
Uinta — Juniper Systems mapping and data collection software
After you've downloaded and installed either Juniper Connect or Uinta on your mobile device, complete the following steps.
Step 1—Create an account with the Iowa DOT RTN network.
Create your account on the official IaRTN website: https://iowadot.gov/consultants-contractors/design/iowa-real-time-network
Step 2—Connect your GNSS receiver to your mobile device.
Using the software you've selected (Uinta or Juniper Connect), connect your GNSS receiver to your mobile device.
For instructions on connecting your GNSS receiver, see
Step 3—Set up the RTK connection profile.
Set up the RTK connection profile for IaRTN in Juniper Connect or Uinta.
Use the following information:
NTRIP address—Use one of the following:
IP address: 165.206.203.10
Host name: iartnrtk.iowadot.gov
Note: If the IP address does not work, verify the address with IaRTN or your network administrator.
Mount point—Download and select the mount point appropriate for your location. If you are unsure which mount point to select, refer to the IaRTN mount point descriptions: https://iowadot.gov/media/1388/download?inline
Network solution mount points work well for most solutions, such as MSM_IMAX.
Single baseline options connect directly to a base station.
Juniper Connect
For instructions on setting up a connection profile in Juniper Connect, see "Add a Network RTK Profile" in Juniper Connect User Manual.
Uinta
Open GPS Settings.

In Select RTK Provider, select Manage NTRIP Profiles.
Tap
 .
.Enter the NTRIP profile information for IaRTN.
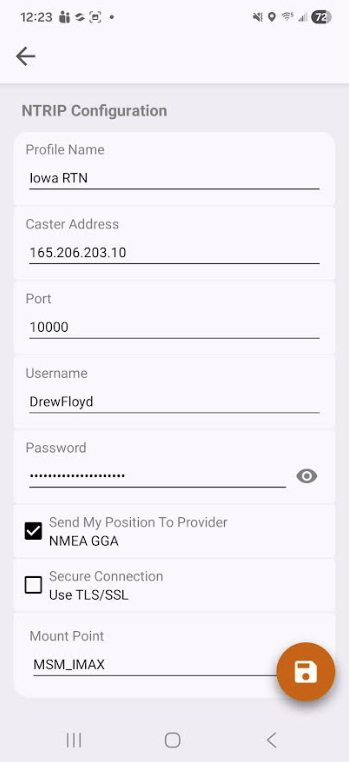
Next to Mount Point, tap
 .
.Open the Mount Point drop-down list and select the appropriate mount point for your location.
Tap Save.
Tap Test to check that Uinta can access the RTK provider and apply the settings.
When the test is finished, tap Apply.
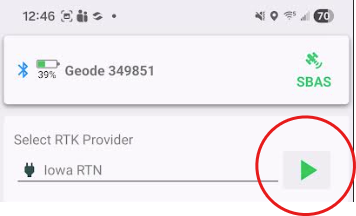
Step 4—Connect to the IaRTN RTK Network.
Connect to the IaRTN RTK network in Juniper Connect or Uinta.
Juniper Connect
For instructions on connecting to the IaRTN RTK network, see "Connect to Network RTK" in the Juniper Connect User Manual.
Uinta
Open GPS Settings.
In Select RTK Provider, select the NTRIP profile for IaRTN. Tap
 .
.
Technical Support
If you need additional help, contact Juniper System Technical Support:
Support website: https://junipersys.com/support
Phone: 435 753-1881
Email: techsupport@junipersys.com