
Connecting a Bluetooth Device to your Handheld
Update: Further information is provided at the following web page.
http://blog.junipersys.com/how-to-connect-bluetooth-device-to-your-handheld/
OVERVIEW
The Microsoft Windows Mobile operating system on our latest rugged handheld computer products comes with the Microsoft Bluetooth stack driver and Bluetooth Manager settings utility pre-installed. This driver stack provides support for connecting to devices that use the following Bluetooth profiles.
GAP- General Access Profile (used by all other profiles for connecting devices)
SPP- Serial Port Profile (GPS receivers, some barcode / RFID scanners, laser range finders, etc.)
DUN- Dial-Up Networking (Modem-type connections, some limitations / technical issues exist)
HID- Human Interface Device (Keyboards, some barcode / RFID scanners, limited mouse support, etc.)
A2DP- Advanced Audio Distribution Profile (mono or stereo audio output)
Beam- Custom utility providing object (file) transfer functionality using some combined features of the OPP (Object Push Profile), FTP (File Transfer Protocol), GOEP (General Objext Exchange Profile), and/or OBEX (Object Exchange) profiles
PAN- Personal Area Network (Some limitations / technical issues exist)
Note- Other profiles such as HFP (Hands-Free Profile), HSP (Headset Profile), and HVRCP (Audio/Video Remote Control Profile) exist in the stack but may have limited (if any) support.
Additional Bluetooth profiles may be provided if installing and using an alternative Bluetooth stack and/or adapter such as from or with Socket Mobile (Drakar), Broadcom (WIDCOMM), Toshiba, AnyCOM, or Bluetopia. Though limited support may be provided for such alternative solutions.
Since the vast majority of Bluetooth devices that are used with our rugged handheld computer products connect through the SPP (Serial Port Profile), you may find it easier to install and connect your Bluetooth device using our custom utility linked from the title below.
INSTRUCTIONS
Instructions on how to setup a Bluetooth device using the Microsoft Bluetooth Manager settings utility is provided below. Following these instructions may prevent you from encountering known issues caused by this utility, as listed at Common connection issues with Bluetooth.
Microsoft Bluetooth Manager device setup
To properly setup a connection to a Bluetooth device using the Microsoft Bluetooth Manager, please follow the steps below.
Turn on the Field PC (insert the Bluetooth adapter card if you do not have integrated Bluetooth). Wait several seconds for the Bluetooth to appear and/or turn on as shown on the Today or Home screen.
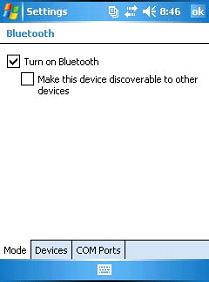
To enable Bluetooth (if not already enabled), tap on Start > Settings > Connections > Bluetooth icon.
Tap on the "Turn on Bluetooth" checkbox to turn on the Bluetooth.
Note: If you would like the Field PC to be discoverable to other Bluetooth devices, tap on the "Make this device discoverable to other devices" checkbox.
Bluetooth Device Partnership
To setup the Field PC to connect with another Bluetooth device, a partnership must be created with the device. To create a new partnership, follow the steps below:
Turn on the other device, enable Bluetooth on the device, and make the device discoverable (if necessary). If the device was previously connected to another computer, the previous partnership may need to be cleared or removed (such as scanning the reset barcode in the user guide of a barcode scanner).
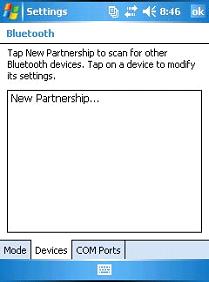
On the Field PC, tap on the Devices tab > New Partnership or Add New Device option, as shown below. Wait several seconds for the Field PC to complete searching for all nearby discoverable Bluetooth devices.
Tap on the name of the device to which you would like to connect from the list of discovered devices, and then tap Next.
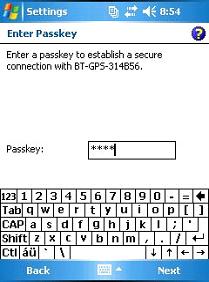
Enter the Bluetooth device`s security Passkey. If the device does not specify or require a Passkey, enter 0000 (or 0183 for some GPS receivers). If no passkey is accepted, leave the field blank, tap Next, and then when asked if you would like to add the device to the device list, tap the NO button.
Note: The Bluetooth device to which you are trying to connect with the Field PC may require a re-confirmation of the Passkey. Confirm the Passkey as instructed on the device (or use 0000), and then return to the Field PC.
Note: Trimble offers a new firmware update to their Pathfinder GPS receivers to allow a Passkey to be assigned. It is recommended to assign a Passkey to the receiver if possible.
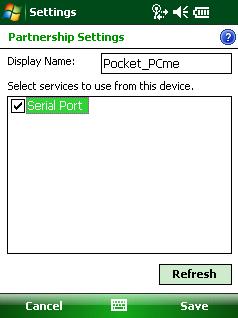
Once the passkey has been accepted (connection established), in the Partnership Settings screen (may need to tap Advanced) check the box next to the service (profile) of the device which you would like to use (most often "Serial Port" especially for GPS receivers).
Note: Not checking the box next to a service may cause future issues when trying to connect using that service, such as when assigning a virtual Outgoing Port number to the device if the "Serial Port" service has not been checked.
If the partnership was successfully created, tap Finish or Save.
The device name should now appear in the Bluetooth Devices list. You may also need to tap and hold on the name of the device then select "Connect" or "Set As..." to immediately enable the connection. If the device should be connecting immediately but is not, you may need to reset the device or clear settings in the device (such as scan the "reset" barcode in the user guide of a barcode scanner).
Bluetooth Virtual COM Port Assignment (for SPP (Serial Port Profile) devices)
Software programs usually require a serial COM port number be selected for communicating with a Bluetooth SPP device (such as a GPS receiver). A virtual serial COM port number can be assigned to a Bluetooth device so the device can be used in these programs. To assign a virtual COM port number to a Bluetooth device, follow the steps below:
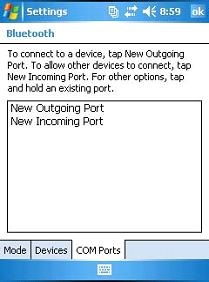
Tap on the COM Ports tab.
If you are connecting to a GPS receiver, printer, or some other peripheral device, tap on the New Outgoing Port option.
If you are allowing another Archer, Bluetooth-enabled computer (ActiveSync), or some other communication-hosting device to connect, tap on the New Incoming Port option.
Tap on the name of the device from the list of device partnerships, and then tap Next.
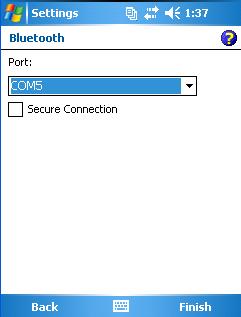
Select a COM port number from the Port: drop-down list, and then tap Finish.
Note: It is recommended to UNCHECK the Secure Connection checkbox. Issues have been encountered when this feature is enabled.
To confirm the success of the new COM port assignment, the device name and COM port number should appear in the Bluetooth COM Ports tab.